Visit my Etsy Shop

Visit my Etsy Shop
Click Photo to Visit my Etsy Shop

Thursday, December 20, 2012

Merry Christmas to All

It's been almost a month since I have posted.  The Winter Stringing magazine came out a couple of weeks ago and I have several items in it.  I was waiting to receive the pictures from the magazine so that I could show you what was published, but have not yet received them.  So, in the meantime, I will just show you my pictures of what they accepted for publication.

First, a pair of earrings using Marti Conrad's wonderful turquoise on speckled stoneware Owl dangles.  The big bead is a 12mm Czech fire polished bead with picasso finish.


I made a necklace that matches these, but they didn't accept the necklace.  It will, however, be published by Bead Trends in February (I believe) or March.  I've lost track.


Next, a bracelet made, again, with Marti Conrad's geometric bracelet connector in a softly applied turquoise glaze on speckled stoneware.  On the left, next to the connector, is one of Lynda Cogbill's, LyndasLampwork, lampwork beads and the other four beads are polymer clay by Alison Crenshaw, BeadsbyEarthTones.


Last, a banded black onyx bracelet with a filigree toggle clasp and jet picasso rondelle beads.


The large rectangle gemstones are beautifully faceted lengthwise and it made an elegant looking bracelet.

I have a necklace and earrings listed in the shop that match it.


Like everyone else, I have been extremely busy during this holiday season.  I am leaving with four of my six brothers and sisters and my Mom for a family vacation to San Antonio, TX.  We leave Christmas Day and will return January 1, 2013.  Joe is staying home to care for the dogs, although I have made the difficult and painful decision to board Justice.  She is doing well, but she is on medications that have to be coordinated with her meals, walking, etc. that my husband has just not totally grasped.  Also, since she and Sophie do fight when not constantly supervised, I think they will all be safer if Justice is boarded. I plan to go visit the facilities later today to make sure they meet with my approval, but Kansas City had its first snow storm last night.  It is very windy - up to 30 miles per hour - blizzard conditions really, and they have even closed I-29 north of Kansas City International Airport to the Iowa line.  That goes right through St. Joseph, MO (Where Diane Long - another published jewelry designer that you may know - lives).  They are recommending that we stay home wrapped in blankets, etc.  I still have internet and utilities and we are warm and full of good food so we are happy and counting our blessings.

I have not made any jewelry since the last Lesley Watt Bronze Snowflake Challenge with one exception.  I had a special order for the bracelet and earring set shown above.  It is gorgeous.  The connector and dangles are by Marti Conrad and the brown beads are by Mary Ann Carroll.  My client was thrilled with it which in turn thrills me.

I don't plan to take my computer on vacation with me as we are all packing very light.  I am leaving my shop open, but have posted a notice that shipping will be delayed until my return.  I will also have contact through my iPhone for returning messages, relisting, etc.

I want to wish you all a very Merry Christmas and a Happy New Year.  May your heart be filled with the love of family and friends and please don't forget to remember what this season is really all about -- the birth of the Holy Christ Child.

Thursday, November 29, 2012

Art Jewelry Elements November Challenge


Lesley Watt of Thea too was the host for the November Challenge of the Art Jewelry Elements blog.  Lesley offered her newly designed 35mm bronze snowflake disc components to two lucky commenters and I was one of the lucky winners.

 The only "catch" is that I had to make something with the disc and blog about it on November 30.  Now that is easy enough, or so I thought.  I really found this piece to be a challenge to work with.  I had several ideas but had to scrap them for one reason or another.   If you are so inclined, you can check out the original giveaway post here at the Art Jewelry Elements Blog.   They do this often so perhaps you might like to give it a try.

Those are Ingrid Mueller's "worms" (her name, not mine) in a 22 gauge copper heavy wrap along with some silver-lined glass beads that have a aurora borealis luster applied that gives them a dark shiny finish that reflects purples, blues, and bronzes.  They really look quite nice with this snowflake.  A frosted quartz dagger (my interpretation of an icicle) dangles at the bottom of the focal.
Here is a list of the other participants.  Please take some time to check out their beautiful designs.


As always, I had a nice time designing with this component.  Thank you, Lesley, for your generous gift and challenge and thanks to all the gang at Art Jewelry Elements for the beautiful work you produce to inspire the rest of us.  

Monday, November 19, 2012

Berries and Leaves Artisan Whimsy Challenge


This is my piece for the Artisan Whimy's November challenge - Berries and Leaves.

I used copper wire to hand form holly leaves which I veined with silver lined green glass beads.  I was also very excited to use some handmade paper beads by Dee Rick of  Passion For Paper Beads. The berries are very small, about 3mm, red coral beads on fine gauge balled copper headpins.  I also used 4mm green malachite beads, and rubberized red rounds and green leaf shapes.

After looking at it for a bit, I have decided that, while I really wanted to love the paper beads in this piece, they just are not intense enough.  So, I replaced them with red rubberized round beads - the same material as the green beads that I used.  I don't like the beads as well as the handmade paper beads, but they may just be my bias toward handmade beads.

I will be giving this necklace away during the Artisan Whimsy Market 2012 Holiday Collection Cyber Sale.

Be sure to check it out HERE to enter to win and I also want to invite you to enjoy 15% off on everything in my shop during the Artisan Whimsy Market Cyber Sale.  

Artisan Whimsey Market 2012 Holiday Collection

Shop the finest Jewelry Designers For the 2012 Holiday Season


Many of our artists have published work & sell their beautiful pieces nationally and internationally.


See something you like?


Please click on the picture to browse their giveaway and view all their 

Fabulous Handmade Jewelry Pieces.


The largest Artisan shopping event
for Cyber Week...Ever!! 


It starts this Friday, Nov. 23rd thru Friday Nov 30th.

All participating jewelry designers will be offering a discount on their stores &

will be promoting a giveaway.  


Winners will be chosen individually by the blog owners.


For event wide discount code use: AWHOLIDAY

We will be hiding

Three Exciting Giveaways 

throughout our participants blogs.  

When you find them, follow the directions to be entered!


I am thrilled to be participating in this Huge Cyber Event hosted by Artisan Whimsy.  Enter to win the above Holly Leaf and Berry Copper Wire Worked Necklace valued at $45.00 by 1) making sure that you are a member of this blog and 2) by leaving a comment with the name of your favorite piece of jewelry from my ETSY SHOP.  You must also leave your e-mail address so that I can get in touch with you if you are the winner.  


I AM OFFERING A 15% DISCOUNT WITH COUPON CODE AWHOLIDAY.  The code is working now so that you can get a jump on your shopping.


Tuesday, November 13, 2012

Prong Setting Challenge

The Metal Team at Artisan Whimsy is hosting its first challenge having to do with prong settings.  Staci Smith prepared an excellent tutorial, and I can attest to the fact that it is excellent because I was able to follow it.  If you are so inclined you can find the tutorial HERE.


If you love beading and are not yet a member of Artisan Whimsy you really need to check it out.  It is a great all-inclusive place to find tutorials, interesting blog articles, and great camaradarie from like-minded folks.

Each month there is something different going on in the form of a challenge for anyone that wants to participate.  I love doing challenges so I try to participate in every one of them.  Anyway, this challenge was about prong settings.  I've never done anything like that.  I had never even used a rivet before this challenge, although I had purchased and tucked away a nice little riveting kit from Rings and Things.  I am so good at buying stuff, but not so good at actually using it.  I had also purchased a small roll of long skinny silver solder about three years ago to solder sterling silver rings together.  I have cabs - I only had one or two ceramic ones but I figured I could make them work.  And, I have a torch (which I actually use)  Knowing that I had these items, I figured I could do this challenge. WRONG!


I want to start off on a positive note, so I am going to start with a picture of my finished project.  It is a brooch, although I still need to get a suitable pin back and attach to the back.  I may have something in my stash, but haven't come across them yet.  


 My first task was to find a cab that I could use as my focal of the project.   The cabs I had were not flat enough and I was afraid that they would break too easily if I tried pushing the prongs down like the tutorial instructed.  I had to find something that I could use as a cab.  I turned to my collection of antique buttons.  I found one that I thought was pretty enough, but it is a Paris Back and I did not want to destroy (or do anything to damage) the button.  If you collect buttons, you know that is significant. This button is circa 1880 and in excellent condition. 


That meant I had to cut a hole in the center of the metal backing to allow for the back of the button since the back is not flat.  Okay, no problem.  So far so good.  So after I cut and textured my copper circle, I set about trying to solder the rivets into the holes I had drilled.  It turns out that the silver solder that I had wouldn't work on the copper - at least not the way I was trying to do it.  I didn't take pictures of that failure, but just suffice it to say that I was not going to be able to solder my rivets to the back of my metal and by the time I figured it out, it was too late to go looking for paste solder. 


I have restored three old houses in my lifetime and because I restore them and don't remodel (there is a big difference) I have had the need to find creative ways to "fix" things including old iron grates and other old metal objects.  "What in the world does that have to do with the prong challenge?" you might be asking yourself.  Well, because of that history, I have discovered JB Weld - a two part epoxy that dries a medium gray color.  Believe me, it is great, no GREAT, stuff.  I have repaired floor grates, wall grates, metal frames, and even black glass buttons with this stuff.  It holds.

So I figured I would try the JB Weld on the prongs instead of solder.  After a couple of trial and error things, I was successful. 


This is a picture of the front of the copper ring with the prongs held into place.

Since I didn't want the back of the button just sticking out the hole, I decided to cut a piece of textured brass sheeting to back the copper.  I would rivet them together.  After all, I had a new riveting system, and rivets, so this was a perfect opportunity to use them. I used some silver rivets for contrast.


I made a cage out of bronze wire for this little piece of genuine Nevada USA rough turquoise.  I purchased a small selection of rough turquoise on a trip out west and have polished and drilled some of the pieces but I still have a little bag of rough turquoise.  This is just as it came from the ground.

All of the patina on the copper and the brass is the result of heating it with my torch which I did several times.


In the first attempt to set the rivets with the JB Weld, I tried to anneal the rivets on the top side with my torch.  Well, the JB Weld caught on fire and it is a wonder I didn't burn the garage down.  (Actually, I work with my torch inside a little area that I set up with fire bricks so it wasn't as bad as I make it sound.)

So, I cleaned everything off and applied the glue again.  The rivets need to be annealed so that the metal is soft and will bend more easily over the cab, or button, in my case.  I don't have a prong-setting tool, but the tutorial suggested that you could use a dowel so that is how I bent the prongs.  Then I used my flush cutters and file to shape the prongs so that they cradled the button nicely.


And, to prove to you that I have no pride, here is a picture of the backside.  I had to pound out a little bump to accommodate the shank of the button, but I tried to keep it as nice as I could.  Please tell me, do you guys think the back is too hokey looking or unprofessional or just plain ugly?


I want to purchase some 33mm pin backs because they have holes at 17mm apart and I can rivet the pin back to the front.  I wish I had riveted it before I riveted the copper to the brass, but I didn't really have that much of a plan at that point.  My current plan is to attach some stars or some other decoration to even out the design.

Anyway, it was a touch and go challenge and I am so, so glad that I participated.  I have a personal rule that I don't buy anything special for a challenge and if I participate, I participate with the materials that I have.  And, with very, very few exceptions, I stick by that rule.  I did in this case.  And, I have never made a brooch before.  I am pleased with it.  What do you guys think?

And, here are links to the other participants.  You will see some beautiful things if you take the time to work through them.


The Beading Yogini, http://www.thebeadingyogini.com

Carolyn Dewison, Blue Berri Beads, http://blueberribeads.co.uk/

Mary Harding, Mary Harding Jewelry, http://www.maryhardingjewelrybeadblog.blogspot.com

Dawn Horner, Northern Adornments, http://northernadornments.blogspot.com/

Gina Hockett, Freestyle Elements, http://freestyleelements.blogspot.com

Heidi Kingman, My Bead Therapy, http://mybeadtherapy.blogspot.com

Alicia Marinache, All the Pretty Things, http://www.allprettythings.ca/

Melissa Muir, Melissa Muir Jewelry, http://design.kcjewelbox.com/

Melinda Orr, Melinda Orr Designs, http://orrtec.blogspot.com/

Staci Louise Smith, Staci Louise Originals, http://www.stacilouiseoriginals.com/

Sherri Stokey, Knot Just Macrame, www.KnotJustMacrame.com

Jo Tinley, Daisy Chain Designs Jewellery, http://www.daisychaindesignsjewellery.blogspot.com

Francesca Watson, Francesca Watson Designs, http://www.francescawatson.com

Linda Younkman, Lindy’s Designs, http://lindysdesigns.blogspot.com/

Friday, November 9, 2012

Artisan Whimsy UK Blog Team Challenge


The Artisan Whimsy UK Blog Team has issued a challenge to create a piece of jewelry or a jewelry component  inspired by a city where each of the team members live.  Read more about the challenge and check out the other entries by visiting Artisan Whimsy.


I chose Liverpool because that is the home of the Beatles and I was in the fourth grade when the Beatles began wanting to Hold My Hand.  They were a huge part of my youth - I owned every Beatle record, singles and albums.  I wish I still had them but once I married, I lost interest in stuff like that and I really have no idea what even happened to them.  Probably ended up in a yard sale or something.


Enough talk - let's see jewelry.


Anyway, about a year and a half ago, Diane Long made me this bracelet connector for the Beatles song "Let It Be".  While it was made for a client's request, it was never used for that project and when I saw this challenge I knew that it was time to use "Let It Be".  To go with the copper connector I searched my stash for things that were inspired by Liverpool - Beatles - peace signs - mood rings, etc.

I made a matching bracelet, necklace and earrings.  Now, for the details.


In addition to "Let It Be", I used a pewter peace charm and bead.  I can't think of the Beatles without thinking about the iconic Peace sign.

On each side of the connector and on the backside of the clasp, I used modern mood beads.  In the 60's we had these in rings - remember the Mood Rings?


It was cold the day I took these pictures, so all of the mood beads are black, but in normal ambient conditions, they glow from yellow, blue, green which mirrors the main beads perfectly.


Now a word about those main beads.  I have had these beads for at least twenty to twenty five years.  They are glass with a metallic spattering of gold, red and green on them.  They are really quite ugly - except in this set.

They reminded me of the neon that was popular during the 60s and I am tickled to pieces that I finally have found a set to use them in.  They really are quite pretty used here.

I also used a couple of mood beads, a pewter peace pendant and made some little dangles out of silver lined red, green and gold seed beads on my own ball end copper headpins.

Those rings are antiqued and textured copper rings by Trinity Brass Co.  At the back, I used a circle ball and circle clasp.


And, last but not least, matching earrings.  I made them a bit asymmetrical because I like them that way.

You can really see the psychedelic nature of these beads in this picture.  I even had them in two sizes.  I'm telling you, I can't believe I held onto them for 25 years just to find the perfect project for them.  As one commenter pointed out, they do resemble tie dye.


The Hosts
 Lesley Watt Gossiping Goddess
Rebecca Anderson Songbeads
Pippa Chandler Pip's Jewellery
Teresa Hulley Bo Hulley Beads
Natalie McKenna Grubbi
Jo Tinley Daisychain Designs
Dorset
Ginger Bishop Lilmummylikes
Cece Cormier The Beading Yogini
Therese Frank Therese’s Treasures
Cilla Watkins Tell Your Girlfriends
Sherry Baun
Edinburgh
Therese Frank Therese’s Treasures
Kashmira Patel Sadafulee
Caroline Dewison Blueberribeads
Sherry Baun
Leigh Thow Jewellrleigh
Lucy Haslam
Bath
Sherry Baun
Isle of Wight
Duane Clark Bizzy Bead
Sharyl McMillian-Nelson Sharyl's Jewelry
Leigh Thow Jewellrleigh
Jean Wright Just Beadey
D Lynne Bowland Islandgirl’s Insights
Sherry Baun
Liverpool
Shalini Austin   Jewellery by Shalini
Doris Stumpf Glaszwerg
Sherry Baun
Lennis C Windbent
Southampton
Sherri Stokey Knot Just Macramé
Sherry Baun
Leigh Thow Jewellrleigh
Kathy Lindemer Bay Moon Design


And, of course the team members are offering prizes.  I am hoping to win a beautiful set of ceramic beads by Natalie McKenna of Grubbi.  Wish me luck.

Tuesday, November 6, 2012

Whiskers II

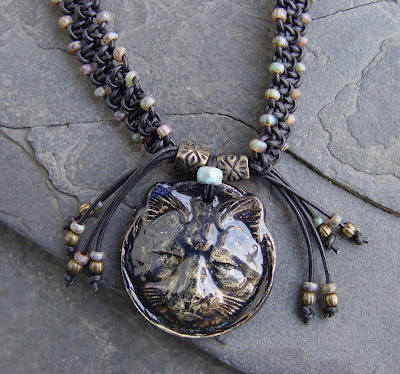
This is my second Whiskers.  This one is not totally black, however, but more like a tortoise shell - you know the brown version of a calico cat.  I'm not sure what they are called, but if anyone knows, please let me know.


 I changed the weaving order a bit on this one to make it different from the first one, but it still has the same overall look.


 I also used a brass bali-style bail to hang the pendant rather than just sandwiching it between two brass beads.
 I used a pipestone heishi bead on the pendant leather bail.

I love pipestone but it is hard to find it in the smaller pieces.

Would love to know where I can find it if any of you know.  *Note:  I did a wikipedia check and have described the color below.

The glaze that Nan used on this pendant flows a blue/white in the creases which is great because when a black cat is shiny, you see blue.


I also left the whiskers a bit longer on this one.  They could easily be shortened if anyone preferred.


I hope you all like this version as well.


You have got to love Wikipedia.  According to it, "tortoiseshell" describes a coat coloring found almost exclusively in female cats.  They are mottled or brindled with patches of orange or cream and chocolate, black or blue.  (That is this pendant for sure.)  As opposed to "calico" cats which are largely white with red and brown patches (rather than the brindle aspect) they have very little or no white on them.


Here is a picture of a tortoiseshell cat.  Isn't she cute?  I had several of these when I was growing up and my first cat after I married was a tortoiseshell.  She had kittens in my laundry basket and I used to get so sleepy watching them.  They were so sweet.

Sunday, November 4, 2012

Whiskers The Black Cat

Continuing in my endeavors to improve my micro-macrame skills, I made a necklace using alternating square knots.  I added striped, aged Czech glass beads between the knots and when I started I was going to use a Thai Amulet Pendant and go for a tribal look. 


Well, as I got closer to finishing the necklace, I realized that the ends looked like whiskers so I used one of  Nan Emmett's black cats.  I had asked her to make some in black so she did and I purchased three of them.


I had to find some beads that would accommodate 8 strands of 1mm leather which was a challenge, but was able to find some in my stash.


I have a hard time using these larger brass clasps that I have and this project was perfect for it.


I'm making another one since this one sold within an hour of listing it on etsy, but in the spirit of making one of a kind pieces, I am modifying the way I do the strap although I am still using alternating square knots. 


Monday, October 29, 2012

News of a Giveaway by TangleBeads

TangleBeads is having a fantastic giveaway of a $90 Gift Certificate for her Etsy Store.  Check it out HERE.

Saturday, October 27, 2012

Sharyl's Jewelry Bead Packet Challenge #2 Featuring Natalie Pappas


Sharyl McMillian-Nelson is featuring a Bead Packet design challenge today and I am absolutely thrilled to be participating.  She is featuring the handmade beads of Natalie Pappas, a bead artist that has long been one of my favorites. You can go to Sharyl's blog and read more about the challenge at Sharyl's Jewelry.


You can read more about Natalie and her art at Natalie's Blog and see more of her beads in her Etsy Store.


Sharyl and Natalie put together a beautiful selection of handmade and stone beads.  Shary's "Rule" was that you had to use at least one of the art beads, but my personal challenge when I participate in these activities is to use all of the beads, but in any event, as many of them as I can.   I got to work as soon as I received the beads.  This is my necklace.  In this case it was easy to use them all.

 I also used some premium seed beads accented with small faceted pink coral beads in colors that complimented the packet of beads chosen by Sharyl and Natalie.


On the left side you will see a beautiful polymer clay bead by Alison Crenshaw - one of her "Imprint" series.


On the right side you will see a rust bird by Cindy Doleazal.  It is sitting on a lampwork "nest" by Joyce O'Shea.


 I used her focal bead to make a pendant.
 The pine cone dangle is by Trinity Brass.

It is joined by a pine cone bead cap on one of  Natalie's beads.
The section around the back of the neck is tied on waxed linen.


The clasp is the "harvest" moon.


I hope you enjoyed my necklace and please take a moment to browse through the following to see the beautiful designs that the other participants made with Natalie's Beads.

Thank you Sharyl for hosting such a fun challenge and for choosing such beautiful beads and Thank You Natalie for being the talented artist behind the beads which made so many beautiful pieces of jewelry possible.

-1. Kashmira Patel  (Sudafulee... Always in Bloom) http://sadafulee.blogspot.com

--2. Sonia Smith (posting on Sharyl's blog) Shary's Blog Here

--3.
Alicia  (All the Pretty Things) 

--4 Cheri  (Creative Designs by Cheri) 

--7
Alice Craddick  (Alice's Beads and Baubles) http://alicesbeadsandbaubles.blogspot.com/

--8. Cilla (Tell Your Girlfriends) 

--9. Whimsical Monkey  (Whimsical Monkey)  

--10. KayzKreationz  (KayzKreationz) 

--11. Jean A. Wells  (Jean A. Wells Handcrafted Artisan Jewelry) http://jeanawells.blogspot.com/

And, news about drawings.  As with many events like this there is a bounty to be won!  In this case, there are 2!  Natalie will be drawing a name from among the designers to win a gift from her store and for the rest of you -- go to Sharyl's blog to read about how to win a chance to win a gift certificate to Sharyl's Jewelry.  Winner will be announced Monday.  


Friday, October 26, 2012

HOOTERS OWL CHALLENGE - ARTISAN WHIMSY


If you haven't checked out the new Artisan Whimsy website, you really owe it to yourself to do so.  It is a "Members Only" site, but its free to join.  There are over 600 members now and it was only launched earlier this month.  It can seem a bit overwhelming at first, but it just takes a little time to find your way around.  It is an all-inclusive website where each member can have their own page and post blogs, etc.  There is a tutorial section so you can find out how to do just about anything jewelry related.  There is a fantastic gallery of thousands of pictures - anyone can post jewelry pictures.  And, there is always some sort of challenge or give-away going on.

The current one is called the Hooters Owl Challenge.  This is a competition to win a fantastic prize so I need you all to support my entry.  You will need to go Artisan Whimsy and register.  The click on the picture that you see (it is the same as the one above). There are two categories, one for Owl Components and one for Jewelry Designs. 


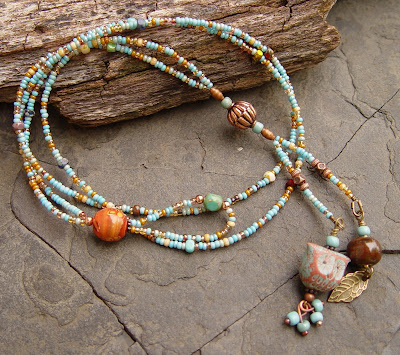
My entry is a lariat that I made using one of Alison Crenshaw's polymer clay owls, one of her polymer clay eggs, and one of Ingrid Mueller's porcelain "pine cone" beads.  The strand is made with a premium topaz and turquoise seed bead mixture highlighted with tri-cut Czech beads with picasso finish and copper beads. I used some of my ball-end copper twisties at the bottom of the owl.


Without sounding too much like begging, I would invite you to go to the website and vote for your favorite in each category.  I would love to have your vote.


We have until October 28 to make our entries and the voting will begin after that.  Be sure to bookmark this page and the Artisan Whimsy site so that you don't forget to enter your vote.

Between midnight October 28 and midnight October 30th you can vote for my necklace HERE


As with most of my jewelry, this piece is for sale and can be purchased in my Etsy Store.


After you vote, come back to this post and leave a comment indicating that you did vote and you will be entered into a drawing that I will have following the Hooters Challenge to win these Pumpkin fall inspired earrings.


Use this as practice for the upcoming Presidential elections to get your voting muscles all warmed up.

This was my second post today, so be sure to read down one post about my new adventure with Kumihimo Braiding and how I have incorporated it into a necklace.

Ancient Kumihimo Weaving

While I have been learning micro-macrame lately, I have also made steps in learning the ancient Japanese weaving technique called Kumihimo.  Kumihimo cord was first created by a form of finger braiding, but later tools were employed to make the braids more complex and in less time.  The most prominent historical use of the cords was by samurai as both a functional and decorative way to lace their armor and their horses' armor. Kumihimo cords are now used as ties on jackets and obijimes which are used for tying on an obi (kimono sash).

Here are examples of my first cords.


The top purple cord was made with 8 strands of 1.5-2.0mm Chinese Knotting Cord and the cord is about 8mm in diameter.

The second cord was made with 8 strands of .5mm Greek leather and it is about 5-6mm in diameter.

The bottom cord was made with 8 strands of .8mm Chinese Knotting Cord and it is about 4-5mm in diameter.


I made this necklace and incorporated a 5" strand of Greek Leather Kumihimo Cord from which I hung a pendant made from Marti's stoneware crescent, a melon carved white stone, and a Thai Buddhist stone charm that has been framed in brass.

I also incorporated sections of alternating half hitch knots which is a knot I recently learned in my work with micro-macrame.

Those are large aged Czech red glass with picasso beads between the cord sections and African brass globe beads at the top.  I finished it off with a chain that I made from jump rings that I made from copper wire.


I am adding the following in response to Linda's inquiry about the type of ends I use. 

 The above photo shows how I tightly wrapped the end of the braid with 24-26 gauge wire then trimmed the end at about 1/8".  The cap that I used is a base metal with silver coating (but not a good coating like silver plating would be) that has an inside diameter of about 4-6mm.  I have these in all sizes from very very small to 10mm and this one was the one that fit the best over the wire and the braid.


 This picture shows the end of the braid shoved into the end cap. I used 527 glue and believe that the wire wrapping and the texture of the braid will enable a good bond inside the bead cap.  I used a lark's head knot to attach the next section of leather to the loop on the end cap and the red beads had a large enough hole that they covered the cap loop giving me a great transition between the kumihimo braid and the alternating half hitch knot sections.

What I didn't like about this end cap was that I didn't like the silver with the brass and copper and leather of the necklace, so I dipped it into a cap full of Novacan Black Patina until it sort of removed or darkened the silver coating.  Once it was dull, I polished it with a jewelry cloth and it gave me the rustic finish that I wanted for my necklace.  I hope this additional information is helpful.